- Welcome to BigMike's Forum.

Recent posts
#41
Trips / Re: Time attacks
Last post by Colston - December 16, 2015, 05:09:27 PMThere are some great rodes south-east of fresno, specifically near Heatland Christian camp. There is also a great long stretch east of P'ville. I recorded a few of my times. There is a 9 mile stretch to Heartland that i have never seen a cop on, and is empty a lot of the time (especially during non-farm or cattle seasons). https://www.google.com/maps/dir/36.6084628,-119.0135274/36.6516734,-118.9572435/@36.6295637,-118.9868653,13.98z?hl=en
I start at the sign that says (Heartland 9 ->) and end at the camp office. I usually pull of in the dirt and start my timer (Ipod nano) i have Velcroed to the rear-view mirror then go when it hits 10 seconds, then subtract 10 at the end. I got 14:52 when i was 18 and just got my mr2. This time was at 1am, it was damp in the shade and there was snow at the end but with no traffic.
Then there is this one: https://www.google.com/maps/dir/36.1121282,-118.5539197/36.1326002,-118.7774811/@36.1378065,-118.7804252,14.25z/data=!4m2!4m1!3e0?hl=en
I start in the dirt behind the California national forest sign with the same timer and race all the way up to a half dirt forest road that ends at another summer camp. when the camp is closed there is a green steel tube gate at the end of the forest road with just enough room to turn around. Its kind of like a road rally with a special stage - I got 39:19 uphill with my gutless stock mr2. I used to work at the camp this ends at - so i used to set times every time i went up, but i lost the book i kept them in. This road is littered with cops, so I made a rule for myself to never cross the yellow line when setting times. I have gotten a 350$ ticket twice for crossing yellow, but every time i have been pulled over just for going fast i get off with a warning.
google map any other roads you guys like.
#42
Projects and Build-Ups / Re: The Rebirth
Last post by BigMike - December 09, 2015, 10:22:27 PMSept 7, 2015: Finally, proper tuning.
The very next day was a milestone day for my car because this happened:
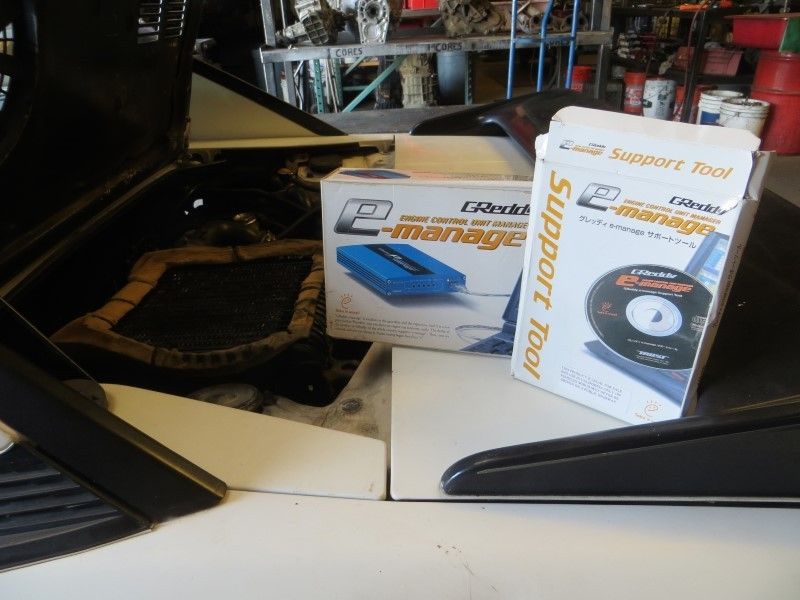

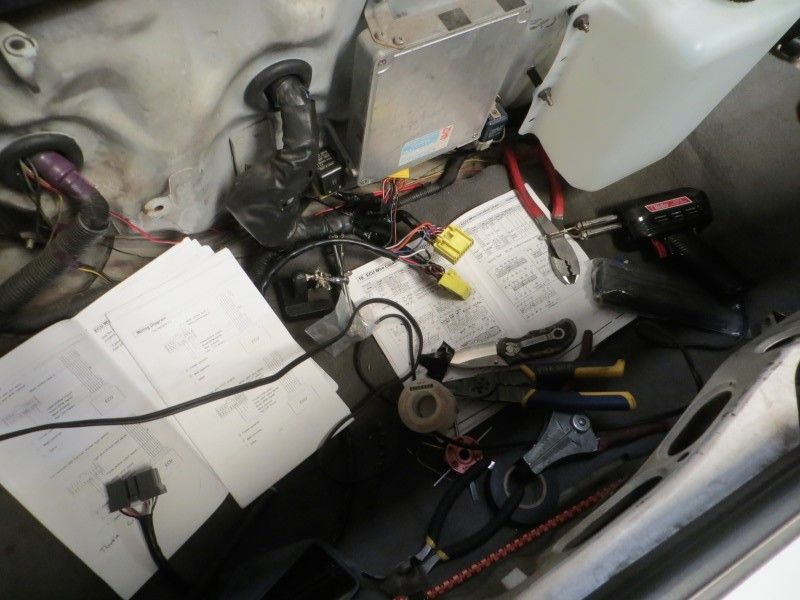
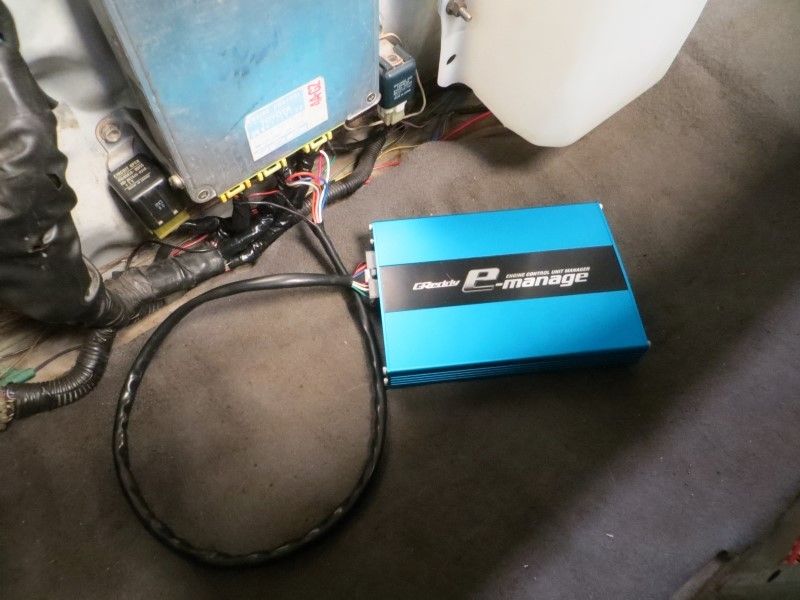
Muchhhh more to come!
The very next day was a milestone day for my car because this happened:
Muchhhh more to come!
#43
Projects and Build-Ups / Re: The Rebirth
Last post by BigMike - December 09, 2015, 10:19:12 PMSept 6, 2015: A return to the WebCam world
After having the ability to Datalog Air/Fuel ratio, I was messing around a lot with my cam timing using stock gears that I had slotted. The slots provided cam advance for both cams to about 10-12 degrees each. I was messing around with them so much and comparing AFR that one day Bill reminded me how he still had my old set of WebCam grind 294s laying around. At this time I wasn't exactly looking for more power but I figured Why Not? H-U-G-E T-H-A-N-K- Y-O-U T-O B-I-L-L!!!!!!! I would be lost without this amazing friend and engine/performance mentor
Removing stock GZE cams:
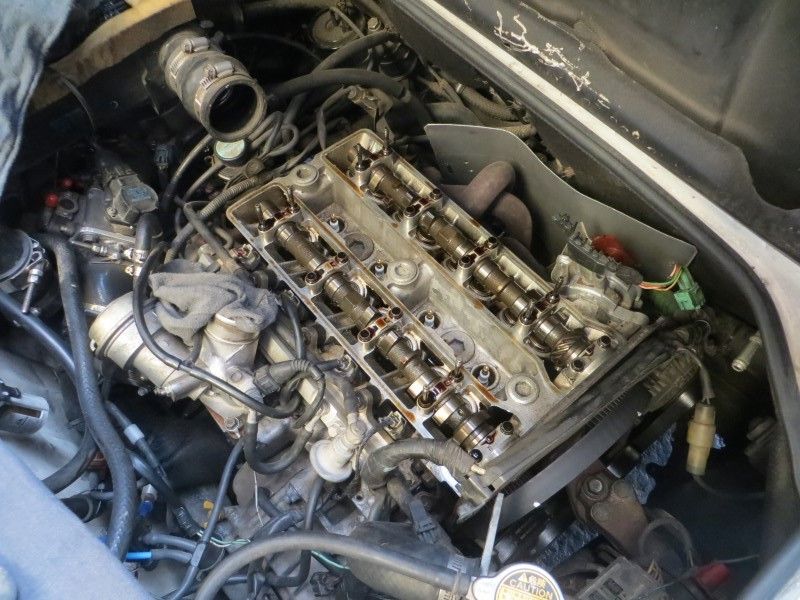
I then checked my cylinder head torque on the ARP studs. Spec is for 60 lb-ft and none moved save the last two at the end of the block. They took almost an eighth of a turn each to get back to 60. Glad I checked them.
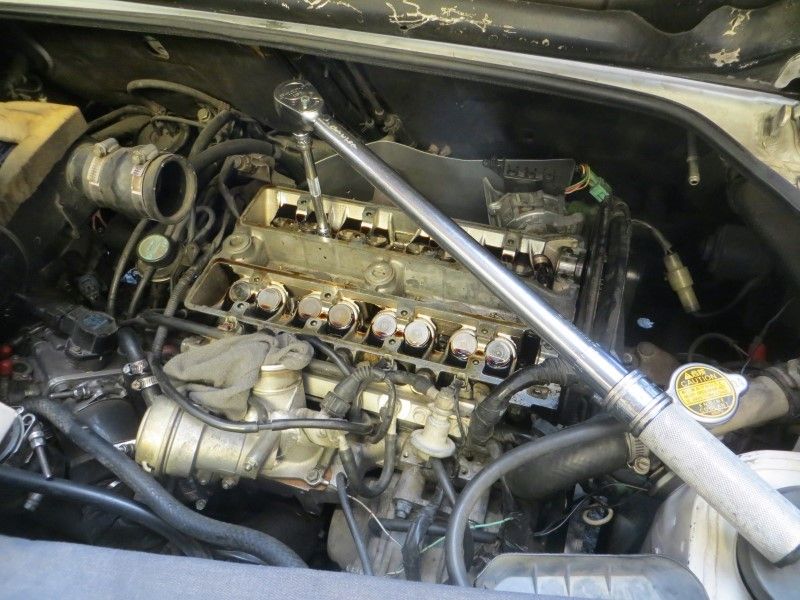
Then the new cams went in. I was having such a good time that I forgot to take even ONE pic of the cams!! I did take before and after valve adjustment measurements:
Cylinder, Exhaust, Intake, in thousandths of an inch:
-- In Ex In
1a 09 11
1b 08 12
2a 08 11
2b 09 11
3a 08 10
3b 06 11
4a 06 11
4b 07 12
A few intakes are on the limit of being tight but they are intake so I wasn't so concerned.
And finally here are some nice shots of her all back together!
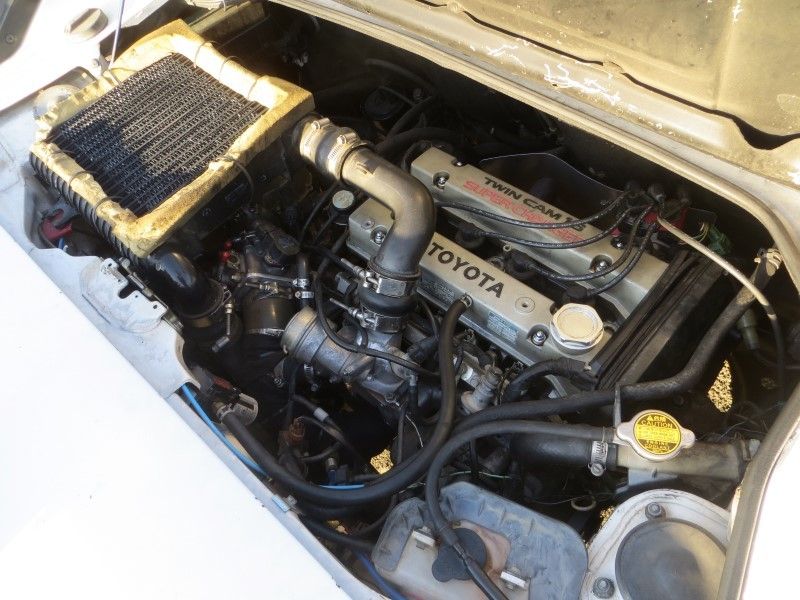
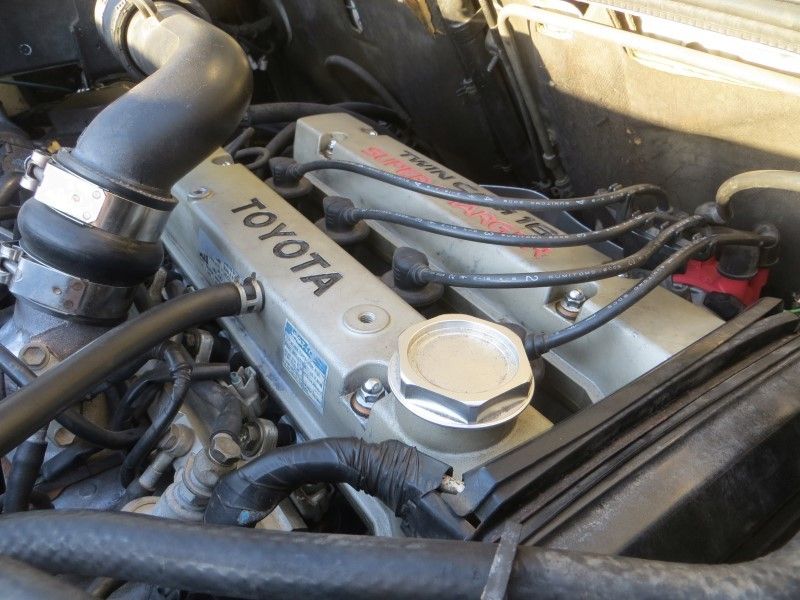
The Mighty 4A-GZE
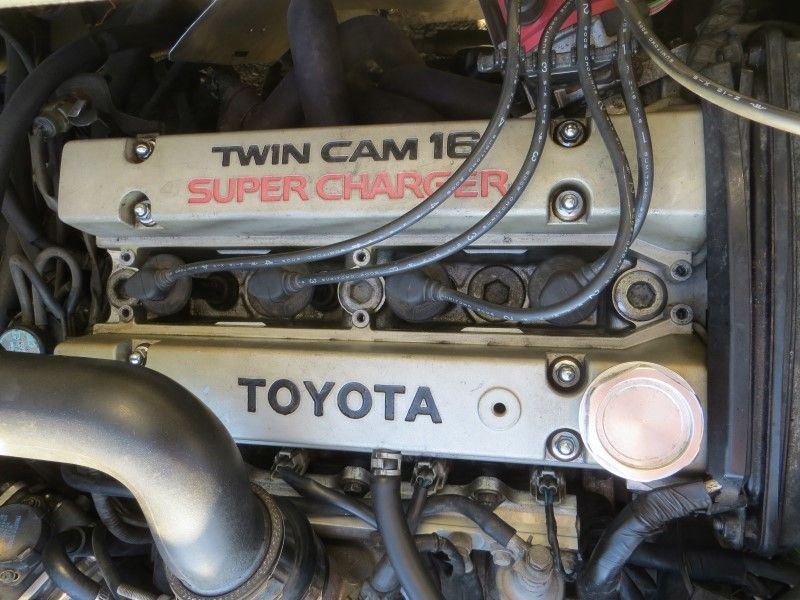
This is now my second time installing grind 294 cams into a 4A-GZE!
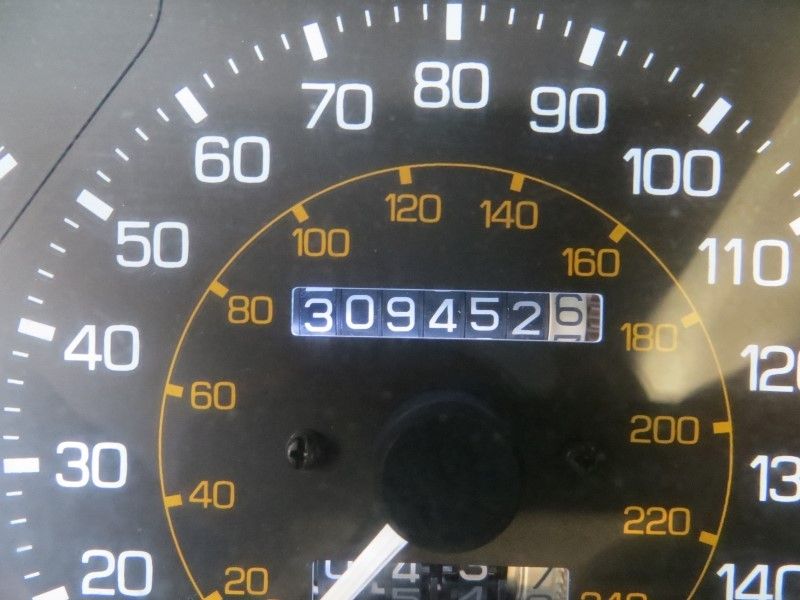
Bonus pic: Approaching 310k miles! :cool:
After having the ability to Datalog Air/Fuel ratio, I was messing around a lot with my cam timing using stock gears that I had slotted. The slots provided cam advance for both cams to about 10-12 degrees each. I was messing around with them so much and comparing AFR that one day Bill reminded me how he still had my old set of WebCam grind 294s laying around. At this time I wasn't exactly looking for more power but I figured Why Not? H-U-G-E T-H-A-N-K- Y-O-U T-O B-I-L-L!!!!!!!
I would be lost without this amazing friend and engine/performance mentor Removing stock GZE cams:
I then checked my cylinder head torque on the ARP studs. Spec is for 60 lb-ft and none moved save the last two at the end of the block. They took almost an eighth of a turn each to get back to 60. Glad I checked them.
Then the new cams went in. I was having such a good time that I forgot to take even ONE pic of the cams!!
I did take before and after valve adjustment measurements:Cylinder, Exhaust, Intake, in thousandths of an inch:
-- In Ex In
1a 09 11
1b 08 12
2a 08 11
2b 09 11
3a 08 10
3b 06 11
4a 06 11
4b 07 12
A few intakes are on the limit of being tight but they are intake so I wasn't so concerned.
And finally here are some nice shots of her all back together!
The Mighty 4A-GZE
This is now my second time installing grind 294 cams into a 4A-GZE!
Bonus pic: Approaching 310k miles! :cool:
#44
Trips / Re: Time attacks
Last post by Sirdeuce - December 06, 2015, 11:06:18 AMHighway 41, Kettleman to Stratford, Night and HOT! 4 1/2 hours. Construction.
Figure fast times need a counter, so here's a slow time.
Figure fast times need a counter, so here's a slow time.
#45
Projects and Build-Ups / Re: The Rebirth
Last post by BigMike - December 02, 2015, 08:20:47 AMLast night I found a nice Brake Bias Calculator and looked over some numbers...
Source: http://www.tceperformanceproducts.com/bias-calculator/ (using published data I've collected online, mm converted to inches)
So at Thunderhill I had 14.6% more rear brake bias than stock and for Laguna this increase will be cut by nearly 2/3rds. If I go with the SW20b rear caliper then I'll actually have more front balance than stock. Interesting...
In terms of just driving around out foothill/mtn roads, I've always preferred a rear brake bias. I'd rather have the rear lock up before the fronts. I hardly have any track experience but beings that one should get all her braking done before each corner, I guess all we'd care about is maximum braking performance in a straight line. Hmmmm.... just the things I think about throughout the day
Regards,
BigMike
Source: http://www.tceperformanceproducts.com/bias-calculator/ (using published data I've collected online, mm converted to inches)
| Stock | Front + Front | ST185 + AW11 | ST185 + SW20b r |
| Front | Rear | Front | Rear | Front | Rear | Front | Rear | |
| Caliper dia: | 2 | 1.437 | 2 | 2 | 2.24409 | 2 | 2.24409 | 1.69291 |
| Rotor dia: | 10.1575 | 10.3937 | 10.1575 | 10.1575 | 10.9449 | 10.1575 | 10.9449 | 10.1575 |
| Pad height: | 1.87 | 1.86 | 1.87 | 1.87 | 2.13 | 1.87 | 2.13 | 1.86 |
| % FRONT BIAS | 64.6% | 50.0% | 58.8% | 66.5% | ||||
| Difference: | -14.6% | -5.8% | +1.9% |
So at Thunderhill I had 14.6% more rear brake bias than stock and for Laguna this increase will be cut by nearly 2/3rds. If I go with the SW20b rear caliper then I'll actually have more front balance than stock. Interesting...
In terms of just driving around out foothill/mtn roads, I've always preferred a rear brake bias. I'd rather have the rear lock up before the fronts. I hardly have any track experience but beings that one should get all her braking done before each corner, I guess all we'd care about is maximum braking performance in a straight line. Hmmmm.... just the things I think about throughout the day
Regards,
BigMike
#46
Projects and Build-Ups / Re: The Rebirth
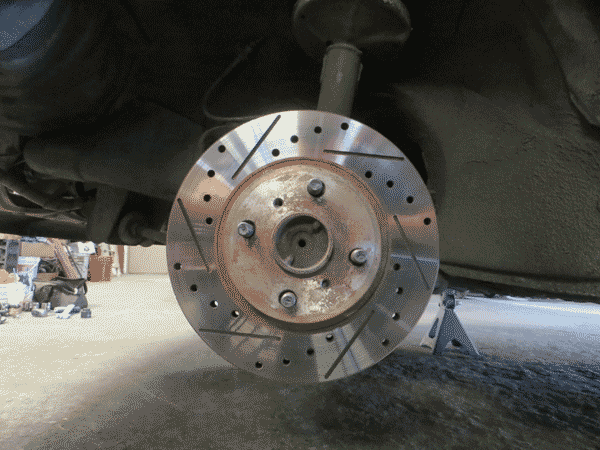
Last post by BigMike - December 01, 2015, 11:15:14 PM258mm vs 278mm Comparison!
As mentioned above this made a HUGE improvement to my brake system. I can't wait to test em out on the track!
Here is a break down of my brake system:
Booster: 1988-89 Supercharged Dual-Diaphragm type
Master Cylinder: 1989-1995.5 1" Hilux (product link from Marlin Crawler)
Front Caliper: ST185 Celica, 57 mm piston
Front Rotor: ST185 Celica 278mm diameter, sourced through Marlin Crawler
Front Pads: Porterfield R4-S Street/Autocross (product link from TwoRUs)
Rear Caliper: 1987-89 AW11b MR2 front, 50.8 mm piston
Rear Rotor: 1987-89 AW11b MR2 front, vented, 258 mm diameter, sourced through Marlin Crawler
Rear Pads: Porterfield R4-S Street/Autocross front pads (product link from TwoRUs)
There is another option here and that would be to use a SW20b rear caliper. It has a piston bore diameter of 43mm which would bring the front-to-rear brake bias ratio of only 9.3% different than stock. So if I somehow manage to warp another set of rear rotors at Laguna, then I'll be switching the SW20b rear calipers. I'll still use AW11b front rotors in the rear.
And that's it for the front brake swap!
#47
Projects and Build-Ups / Re: The Rebirth
Last post by BigMike - December 01, 2015, 11:09:56 PMSept 4, 2015: Front Brake Upgrade (continued)
The ST185 calipers line up and bolt directly to the AW11 front spindle. It could be used as-is but the pads overlap the rotor a bit. Grind the caliper bolt holes as needed to get the rotor to contact all of the pads
Done!!
The ST185 calipers line up and bolt directly to the AW11 front spindle. It could be used as-is but the pads overlap the rotor a bit. Grind the caliper bolt holes as needed to get the rotor to contact all of the pads
Done!!
#48
Projects and Build-Ups / Re: The Rebirth
Last post by BigMike - December 01, 2015, 11:05:55 PMSept 4, 2015: Front Brake Upgrade (continued)
Here is the second attempt and this time I did a better job
Here is the second attempt and this time I did a better job
#49
Projects and Build-Ups / Re: The Rebirth
Last post by BigMike - December 01, 2015, 10:53:01 PMSept 4, 2015: Front Brake Upgrade (continued)
The keen observer might be wondering about the 5-lug pattern of the Celica rotors. But the thing that makes this job easy is that both the AW11 and the Celica use the same hub dimension. So all you have to do is center the disc using the hub/rotor ID, align one lug hole, and then mark and drill three new holes.
What I did was I found a large socket that would just perfectly fit in the rotor ID. For me it happened to be a 39mm impact SnapOn socket. With both rotors concentric, tighten down a bolt to hold them in place, mark the pattern, and drill away. The 4-bolt piece you see here is a machined out center from my old rear non-vented rotors that I use as a wheel space. But the same would apply if you took a stock rotor and mounted it upside down.
I didn't do so well with the first rotor as one hole broke into one of the Celica's pattern, but in the end it doesn't matter. The hub is what centers the rotor and the force across the surfaces of both faces is what the torque is passing through, NOT the studs.
#50
Projects and Build-Ups / Re: The Rebirth
Last post by BigMike - December 01, 2015, 10:44:54 PMSept 4, 2015: Front Brake Upgrade (continued)
All that extra meat comes with a big downside. Ugggg. Rotational mass and unsprung weight. I know, two piece rotors could be just as light as stock such as a Wilwood setup, but again, $$. At any rate they can always be upgraded later.
Oh I forgot, I was also looking at the Lotus Elise/Exige's brake rotor size and they run 288 mm front discs. So not only is my MR2 heavier but it has 11.6% smaller front brakes? Yeah screw that! This front brake upgrade was loooooong overdue!