
And finally, found some very old pics (that were very small) of a F40-type dual exit scoop design. I like this a lot but not sure if I can make it turn out so nice...
- Welcome to BigMike's Forum.
This section allows you to view all posts made by this member. Note that you can only see posts made in areas you currently have access to.
#46
Aero and Fluid Theory / Re: MR2 MK1 Radiater Air Scoop Picture Collection
May 10, 2015, 03:54:42 PM #47
Aero and Fluid Theory / Re: MR2 MK1 Radiater Air Scoop Picture Collection
May 10, 2015, 03:53:34 PM
Moar
#48
Aero and Fluid Theory / Re: MR2 MK1 Radiater Air Scoop Picture Collection
May 10, 2015, 03:51:09 PM
I've been collecting more pics of this and I'd like to get them uploaded. I'm sure I've said this before, but I plan to start on my reverse hood scoop by this summer. 
#49
Projects and Build-Ups / Re: The Rebirth
May 07, 2015, 03:15:16 PMQuote from: Sirdeuce on May 05, 2015, 06:53:10 PMWouldn't the plus ~15% gasoline cause issues with my ECU and AFR?
E-85 $3.00 per GALLON, that's uh $1.50 1/2 gallon.
#50
Projects and Build-Ups / Re: The Rebirth
April 26, 2015, 06:09:38 PM
March 20, 2015 (continued)
Regarding the methanol, I did some research. I was originally going to go with Denatured Alcohol, which is 90+% ethanol and can be found conveniently at hardware stores, but I found that it doesn't have as good of benefits as does Methanol so I looked elsewhere. In the past I had purchased a 5-gallon bucket of Methanol but the problem was that I use it so slowly that the alcohol would go flat before I could even use it all. So looking around I found that I could use HEET, a gasline antifreeze, which is 100% methanol and can be found at any auto parts store. So I did some different shopping around and took some notes:
HEET, Amazon, one 12oz bottle - $4.70 - price per 1/2 gallon: $25.07
HEET, NAPA, one 12oz bottle - $2.49 - price per 1/2 gallon: $13.28
House Brand, NAPA, one 12oz bottle - $2.22 - price per 1/2 gallon: $11.84
Case of Polar, Amazon, twenty-four 10oz bottles - $27.95 - price per 1/2 gallon: $7.45
So while $7.45 per use seems like a lot (50/50 mix), the Denatured Alcohol approach is over $15 per half-gallon. So this approach is more than 50% cheaper and it's of a better, preferred methanol alcohol.
Broken down per bottle, it's $1.24, and if I use six, then it's a 46.9% methanol and 53.1% water (by volume). I'm happy with this.
Here I am entering five (because I was only down to about 60% water). I did have a bottle of HEET in my garage that was a few yrs old, but I figured what the hell so threw it in.
#51
Projects and Build-Ups / Re: The Rebirth
April 26, 2015, 06:08:54 PM
March 20, 2015, The final day: Changed Oil, Washed Car, plus other BONUS things!
Finished off the last two items: Changed oil & washed car! The list now looks like this:
Completed "WHAT HAS TO BE DONE" list: (T-MINUS 2 DAYS)
I also did the following extra stuff:
- Inspected spark plugs (they have almost 70k miles on them and I plan to replace them soon). Gaps: Cylinder 1: 0.045", 2: 0.045", 3: 0.045", 4: 0.048". Cyl 4 was strange, so I closed it down to .045".
- Measured Tire Tread Depths: Driver's Front: 6.38mm, Rear: 5.56mm, Passenger's Front: 6.38mm, Rear: 5.45mm. Decided to not rotate them (assuming the fronts will take more wear on the track).
- FINALLY replaced my original faded Marlin Crawler Turtle Stickers, which were installed back in the summer of 1999!!
- Installed a cool "I Love My MR2" sticker but way it was packaged confused me and I thought it was white. I need to order a white one now and replace this one soon.
- I built and installed a nifty Heat Shield. Ever since removing the rear carpet I had no idea how hot it gets back there. This shield is VERY nice. I got this header ceramic coated before installing it but if you ask me they did a crappy job and the coating has long since flaked off. That header gets pretty dang hot. Either that or it's running so rich that my EGTs are too high ... but I'm making good gas mileage so it's probably not that.
- Added a remote way to access the memory card of my Propeller. This way I can cycle it out easily in between sessions to label each data logging without needing to remove the new front aluminum face/cover.
- Ran Compression: Cylinder 1: 180 PSI, 2: 181 PSI, 3: 177 PSI, 4: 170 PSI. Hmmm a bit low on cylinder 4. Interesting...
- And finally, METHANOL!!!!
Finished off the last two items: Changed oil & washed car! The list now looks like this:
Completed "WHAT HAS TO BE DONE" list: (T-MINUS 2 DAYS)
Driver's rear wheel bearingMachine Brake RotorsNew brake fluidFix my axle seal leakInstall new Redline MT90Address Clutch Master Cylinder IssueWater InjectionMount S/C & IC Fan SwitchesMount dash matMount Propeller LCD panelAdd a switch to my speaker systemChange engine oilClean air filterWash the car
I also did the following extra stuff:
- Inspected spark plugs (they have almost 70k miles on them and I plan to replace them soon). Gaps: Cylinder 1: 0.045", 2: 0.045", 3: 0.045", 4: 0.048". Cyl 4 was strange, so I closed it down to .045".
- Measured Tire Tread Depths: Driver's Front: 6.38mm, Rear: 5.56mm, Passenger's Front: 6.38mm, Rear: 5.45mm. Decided to not rotate them (assuming the fronts will take more wear on the track).
- FINALLY replaced my original faded Marlin Crawler Turtle Stickers, which were installed back in the summer of 1999!!
- Installed a cool "I Love My MR2" sticker but way it was packaged confused me and I thought it was white. I need to order a white one now and replace this one soon.
- I built and installed a nifty Heat Shield. Ever since removing the rear carpet I had no idea how hot it gets back there. This shield is VERY nice. I got this header ceramic coated before installing it but if you ask me they did a crappy job and the coating has long since flaked off. That header gets pretty dang hot. Either that or it's running so rich that my EGTs are too high ... but I'm making good gas mileage so it's probably not that.
- Added a remote way to access the memory card of my Propeller. This way I can cycle it out easily in between sessions to label each data logging without needing to remove the new front aluminum face/cover.
- Ran Compression: Cylinder 1: 180 PSI, 2: 181 PSI, 3: 177 PSI, 4: 170 PSI. Hmmm a bit low on cylinder 4. Interesting...
- And finally, METHANOL!!!!
#52
Projects and Build-Ups / Re: The Rebirth
April 26, 2015, 05:39:13 PM
March 19, 2015 (continued): Something special came in the mail!
Uhhh ohhh!! What could these be??

Uhhh ohhh!! What could these be??
#53
Projects and Build-Ups / Re: The Rebirth
April 26, 2015, 05:37:33 PM
March 19, 2015: Stepped down to 10 GPH nozzle, Shortened line to nozzle
According to this page, approximate nozzle flow rates are as follows:
I've been testing a 15 GPH nozzle I had from when I Supercharged my Hilux, and a few days ago I received new 5 & 10 GPH nozzles from McMaster Car. So I figured I would switch over to the 10 GPH nozzle, or the M10 / 3178K76 nozzle.
Also, I have not tested how long I can drive aggressively on my 1 gallon water tank. Will it last for a full 20-25 minute track session? Concerns I have are... 1) I do not have any system of monitoring my water level, 2) I have yet to connect an indicator lamp for when the pump cycles, 3) If I run out of water the pump will just run forever, and 4) Even if I go up in the foothills for some spirited driving, there is no way I'll be using nearly as much WOT as on a track.
So I figured dropping down 1 injector size would be a good idea. If I run through the entire tank on my first session then I could always switch to the even smaller (5 GPH) nozzle easily before the next session.
Also, I finally got a 90-degree elbow and shortened up the distance between solenoid and injector. After doing this I realized..... why didn't I just get a 1/4" x 90-degree FITTING? Well, I already purchased it so as redundant as it is it's going into service. Also shown are these neat little red safety clips to prevent the push fit from being pushed apart, but unfortunately they don't work on all the fittings (McMaster Car P/N 51055K413).
According to this page, approximate nozzle flow rates are as follows:
- 5 GPH nozzle: Good for small displacement engines in the 150-300hp range.
- 10 GPH nozzle: Good for small displacement engines in the 200-450hp range.
- 15 GPH nozzle: Good for a large displacement engines making more than 400hp.
I've been testing a 15 GPH nozzle I had from when I Supercharged my Hilux, and a few days ago I received new 5 & 10 GPH nozzles from McMaster Car. So I figured I would switch over to the 10 GPH nozzle, or the M10 / 3178K76 nozzle.
Also, I have not tested how long I can drive aggressively on my 1 gallon water tank. Will it last for a full 20-25 minute track session? Concerns I have are... 1) I do not have any system of monitoring my water level, 2) I have yet to connect an indicator lamp for when the pump cycles, 3) If I run out of water the pump will just run forever, and 4) Even if I go up in the foothills for some spirited driving, there is no way I'll be using nearly as much WOT as on a track.
So I figured dropping down 1 injector size would be a good idea. If I run through the entire tank on my first session then I could always switch to the even smaller (5 GPH) nozzle easily before the next session.
Also, I finally got a 90-degree elbow and shortened up the distance between solenoid and injector. After doing this I realized..... why didn't I just get a 1/4" x 90-degree FITTING? Well, I already purchased it so as redundant as it is it's going into service. Also shown are these neat little red safety clips to prevent the push fit from being pushed apart, but unfortunately they don't work on all the fittings (McMaster Car P/N 51055K413).
#54
Projects and Build-Ups / Re: The Rebirth
April 24, 2015, 05:50:48 PM
Oh, I forgot to include how I did change out the above orange 2 amp 5 vdc relay with a more heavy duty 10 amp 5 vdc relay that also fits my breadboard soooo much better. It has a nice, positive insertion/snap into the breadboard and is very solid. Requires a lot of work to wiggle it off so I am very happy with it.
Sorry for the blurry picture, it's the only one I have.
The way it's working is that it is a DPDT relay (double-pole double-throw) meaning it has two isolated circuits. One circuit grounds the water injection solenoid while the other circuit grounds the blue LED I've installed into the face plate (that I don't have a picture of). And that's it. Pretty simple.
Pic of old 2 amp 5 vdc relay (from reply #394) that I had to "strap" down using extra wires due to how lose it fit:
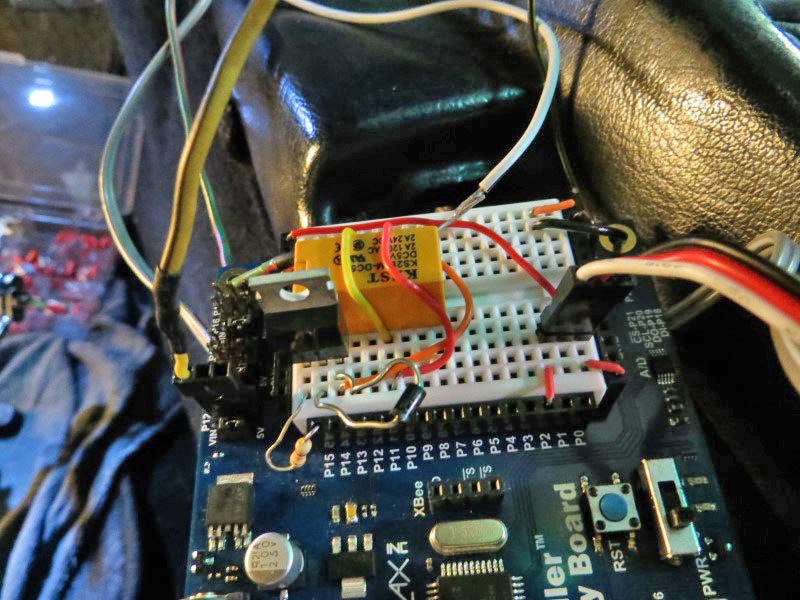
Also note how I moved the LCD wire from P2 now next to the yellow Servo wire at P13. SO MUCH better. Cleaner, neater, and stronger as the two provide support for one another. (This was listed in the v3.1 Release Notes shown in reply #398.) The red and gray wires that are twisted together and leave the picture to the left are the new wires for the injection solenoid LED indicator lamp.
Sorry for the blurry picture, it's the only one I have.
The way it's working is that it is a DPDT relay (double-pole double-throw) meaning it has two isolated circuits. One circuit grounds the water injection solenoid while the other circuit grounds the blue LED I've installed into the face plate (that I don't have a picture of). And that's it. Pretty simple.
Pic of old 2 amp 5 vdc relay (from reply #394) that I had to "strap" down using extra wires due to how lose it fit:
Also note how I moved the LCD wire from P2 now next to the yellow Servo wire at P13. SO MUCH better. Cleaner, neater, and stronger as the two provide support for one another. (This was listed in the v3.1 Release Notes shown in reply #398.) The red and gray wires that are twisted together and leave the picture to the left are the new wires for the injection solenoid LED indicator lamp.
#55
Projects and Build-Ups / Re: The Rebirth
April 24, 2015, 04:00:49 PM
Updated "WHAT HAS TO BE DONE" list: (T-MINUS 4 DAYS)
Ok, looking very good. I'm finally beginning to both relax and feel like I can be ready for Thunderhill this Sunday!! There is one issue, which is that I have not done a spirited mountain run in a loooong time. I need to do a shake down run -- make sure the new brake pads feel good, all the recent work is reliable, even to ensure this water-injection system is gonna work well when driven hard. Hoping to have time to head up through Wonder Valley or somewhere Friday afternoon... Man, just thinking about having time to test everything out is making me very
Driver's rear wheel bearingMachine Brake RotorsNew brake fluidFix my axle seal leakInstall new Redline MT90Address Clutch Master Cylinder IssueWater InjectionMount S/C & IC Fan SwitchesMount dash matMount Propeller LCD panelAdd a switch to my speaker system- Change engine oil
Clean air filter- Wash the car
Ok, looking very good. I'm finally beginning to both relax and feel like I can be ready for Thunderhill this Sunday!! There is one issue, which is that I have not done a spirited mountain run in a loooong time. I need to do a shake down run -- make sure the new brake pads feel good, all the recent work is reliable, even to ensure this water-injection system is gonna work well when driven hard. Hoping to have time to head up through Wonder Valley or somewhere Friday afternoon... Man, just thinking about having time to test everything out is making me very
#56
Projects and Build-Ups / Re: The Rebirth
April 24, 2015, 03:53:10 PM
March 18, 2015: Mounted Fan, Water Injection, & S/C switches and added switch to turn off my speakers
This was also really fun.
Moving right along I got all my loose switches mounted and also installed a switch to turn off my speakers.
When I was younger I made some sort of snap-in plate that could be easily removed to service switch/wires, but it was loose, dumb, and would sometimes pop out of place if you jammed a switch without care. So I knew I wanted to do something far more professional of a job and this is what resulted. Now when I flip switches I don't have to hold the switch body with two fingers while flipping the switch with my thumb.
SO NICE NOW, everything is coming together so well, really getting excited and more and more proud of this car! Also it's so nice and quiet with the speakers switched off -- before, despite using a ground-loop isolator, when no music was playing from my cell phone there would be a constant high frequency buzz. The car is somehow becoming so much more enjoyable to drive
White switch: Intercooler fan
Yellow switch: Enable/disable water injection
Green switch: Enable/disable Supercharger
Chrome switch: Enable/disable speakers
Also, I didn't get a pic of it, but if you look to the top-right of the LCD panel in the next-to-last picture, you can see I drilled a hole. This is for a blue LED light that I installed to indicate when the Water Injection Solenoid is open. Everything is working just great!
#57
Projects and Build-Ups / Re: The Rebirth
April 24, 2015, 03:45:44 PM
March 17, 2015: Mounted LCD Panel! (continued)
The plate came out really nice. There are a few scratches on it but I think it just ads character I simply drilled out the upper radio deck sheet metal screw holes and inserted long 6mm bolts from the backside. The bolts are tightened down with nuts, and then the aluminum plate goes over the bolt and another pair of nuts tightens it down. So it goes bolt head -> MR2 radio bracket -> nut -> sheet metal plate -> nut. So simple, and only requires removing two nuts to gain access to do wiring, service on the Propeller.
Next was to mount the LCD panel. I decided to mount it in the upper left hand corner for scalability, leaving space to install four of these panels if needed. And that was it!
The plate came out really nice. There are a few scratches on it but I think it just ads character
I simply drilled out the upper radio deck sheet metal screw holes and inserted long 6mm bolts from the backside. The bolts are tightened down with nuts, and then the aluminum plate goes over the bolt and another pair of nuts tightens it down. So it goes bolt head -> MR2 radio bracket -> nut -> sheet metal plate -> nut. So simple, and only requires removing two nuts to gain access to do wiring, service on the Propeller.Next was to mount the LCD panel. I decided to mount it in the upper left hand corner for scalability, leaving space to install four of these panels if needed. And that was it!
#58
Projects and Build-Ups / Re: The Rebirth
April 24, 2015, 03:41:34 PM
March 17, 2015: Mounted LCD Panel!
This was fun.
Got the LCD Panel mounted. Originally installed Dec 6, it was extremely nice getting it mounted. Moreover, I have never had the radio bay cleaned up like this since the first couple of years when I had a pioneer radio deck that got stolen, and when I say stolen I mean they used a 10-foot long pry bar and busted up tons of plastic and bent metal brackets all up those sum bitches. So I've just never cared to reinstall a radio deck because, well, screw them. But of course with a track day I can't have "any loose items" as mentioned so this had to be done.
SO happy with how it came out! Pics!
#59
Projects and Build-Ups / Re: The Rebirth
April 24, 2015, 03:34:17 PM
Updated "WHAT HAS TO BE DONE" list: (T-MINUS 6 DAYS)
Only 6 days left
Driver's rear wheel bearingMachine Brake RotorsNew brake fluidFix my axle seal leakInstall new Redline MT90Address Clutch Master Cylinder IssueWater Injection- Mount S/C & IC Fan Switches
Mount dash mat- Mount Propeller LCD panel
- Add a switch to my speaker system
- Change engine oil
Clean air filter- Wash the car
Only 6 days left
#60
Projects and Build-Ups / Re: The Rebirth
April 24, 2015, 03:32:00 PM
March 16, 2015: Cleaned Air Filter, *finally* mounted Dash Mat
A few days later I cleaned my air filter (haven't done it in about 6 months) and finally mounted my dash mat. This may sound trivial to, well, everyone, but this is the same dash mat that was in the car when I bought it Jan 31, 1999, and it was half-falling off just the same. In allllllll these years and experiences with the car I've never redone the velcro pads. There was a time about 3 yrs ago where I purchased a new dash mat on eBay, but the dumb thing wasn't cut for the glove box opening and it didn't wrap around the side air vents so I never installed it (still just sitting around in my garage).
So when you've owned a car this long and you've hardly spent any time on the interior, it really felt great I included a pic from a few weeks ago of what it used to look like for reference. Sorry the new, mounted pic is blurry, it was dark and I only had my cell phn camera at the time.
Oh, also, while cleaning the filter, it started breaking apart. Looks like it's time to get a new filter element. It is pretty thick so I know I can still use it, but I will be ordering a new element soon.
A few days later I cleaned my air filter (haven't done it in about 6 months) and finally mounted my dash mat. This may sound trivial to, well, everyone, but this is the same dash mat that was in the car when I bought it Jan 31, 1999, and it was half-falling off just the same. In allllllll these years and experiences with the car I've never redone the velcro pads. There was a time about 3 yrs ago where I purchased a new dash mat on eBay, but the dumb thing wasn't cut for the glove box opening and it didn't wrap around the side air vents so I never installed it (still just sitting around in my garage).
So when you've owned a car this long and you've hardly spent any time on the interior, it really felt great
I included a pic from a few weeks ago of what it used to look like for reference. Sorry the new, mounted pic is blurry, it was dark and I only had my cell phn camera at the time.Oh, also, while cleaning the filter, it started breaking apart. Looks like it's time to get a new filter element. It is pretty thick so I know I can still use it, but I will be ordering a new element soon.