Main Menu
Menu

Show posts

This section allows you to view all posts made by this member. Note that you can only see posts made in areas you currently have access to.

Show posts Menu

Messages - BigMike

#76
Projects and Build-Ups / Re: The Rebirth
April 19, 2015, 05:27:20 PM
March 6, 2015: Did a lot of stuff (continued)

This was a good day.

Finally replaced my leaking axle seal

This is the low mileage seal that I caused to start leaking back in October (see reply 337). Been trying to patch it up ever since with no success.

Pic 2: Nice shot of the 6-speed tailhousing

Pic 4: New seal installed!

Pic 5 & 6: Again, be sure to roughen-up sealing surfaces before using them with new seals -- otherwise the new seal won't be able to break-in using a finely polished sealing surface. Note the criss-cross patterns.

Pic 7: Gonna switch to MT90. It's been a good 11 or 12 yrs since I've used it.

UPDATE on MT90: It DEFINITELY shifts better than Amsoil. I was quite impressed. It does feel thinner. The Amsoil lasted 60,000-something miles. I hope this Redline isn't too thin because I put this transaxle through more torque than it was originally used to. The only time I've blown up a transaxle was a C56 (destroyed 3rd gear with my old SC14-powered GZE) and it was using... dun dun dun... MT90. Either way the Amsoil had been through a lot so I'm glad to get some fresh oil in there.
#77
Projects and Build-Ups / Re: The Rebirth
April 19, 2015, 05:00:53 PM
March 6, 2015: Did a lot of stuff

This was a good day.

Replaced Driver's Rear Wheel Bearing

Old bearing had been progressively getting worse and worse. This was something I definitely needed to get done before Thunderhill.

Pic 3: Nasty old grease

Pic 5 & 6: Pitting in both inner and outer races

Pic 8: Make sure you roughen up sealing surfaces before installing a new seal!
#78
Projects and Build-Ups / Re: The Rebirth
April 19, 2015, 03:53:37 PM
March 3, 2015: Cut out Hood Supports in preparation of Reverse Hood Scoop

As I was building the water inj kit I realized I both had ordered some wrong fittings and needed additional fittings. (Placement of parts was changing as the kit was coming together and straight push-to-fit ended up needing to be 90-degree fittings, etc, you'll get to experience this too maybe haha.)

So I had some time to kill & decided to cut out the support of my front hood. The primary reason for this was because they need to be removed for the reverse hood scoop install. Yes I documented the weight savings, but this will soon be nullified as the reverse hood scoop will certainly add weight to the hood.

Hood weight before: 32.8 lbs
Hood weight after: 30.3 lbs
Difference: 2.5 lbs
Reverse hood scoop: Will add MUCH more weight than what was removed!

One thing I messed up on was I cut out the hole/mount that is used for the hood rod. DOH!! So I slotted part of the hood near where the original hole was so that the hood rod has some place to sort-of stay. It works just fine, but if there was a sudden gust of wind, the hood could potentially blow back, cause the rod to become free, and then slam shut. (IE. the hook portion of the rod is no longer hooked to anything.)
#79
Projects and Build-Ups / Re: The Rebirth
April 19, 2015, 02:59:42 PM
March 1, 2015 (continued): Project "Complete Water Injection" Day 1 (continued)

I then moved my attention to testing out the pump, solenoid, and injector. I don't know why but I took like a 45-degree picture, so the picture posted has been rotated and trimmed to get the water tank and injector in view.

Also here is a close-up of the injector. In the past I had only used a low pressure injection system with barbed fittings, but now I'm using high pressure with push / quick disconnect fittings. So I was still trying to gather up parts which is why there are a bunch of different adapters on my injector. I was just trying to test things out at this point.

Here is the setup I'm using:

Water Pump: SHURflow 60 psi pump, p/n 8009-541-236 - $70 on Amazon (link). This is a tried a true pump for the DIY market: People are using them all over the place. They have a built-in and adjustable pressure switch which is handy when used with an accumulator (described below). There is also a 100 PSI version available but at the time I didn't know about it and bought this one. No regrets, it works great.

Solenoid: Generic made-in-China 1/4" electronic solenoid - $12 on Amazon (link). The solenoid is used to prevent water from siphoning into the engine under vacuum. There are many better solenoids but for now I'm gonna give this one a shot. Need to make sure even just the basics are working before I can start fine tuning things. In the past I have used low pressure check-valves for this same reason, but I plan to have a constant pressure acting on the solenoid (described below) so for this DIY I need it to be electric.
UPDATE: This solenoid turned out to be a real PILE OF CRAP! Please see reply #426 and DON'T BUY THIS $12 Amazon one. I urge you to drop $$ on a good quality solenoid as described in reply 426.

Accumulator: SHURflow Accumulator, p/n 181-201 - $40 on Amazon (link). The accumulator is used to maintain a minimum set pressure at the front of the solenoid so that the moment the solenoid opens there is always an instant high pressure supply for the injector. Higher pressure = finer mist coming out of injector = more energy (heat) required to change from liquid to vapor.

What is the Accumulator for?
The way it works is that it has an internal bladder that is pressurized (I'm using my bicycle shock pump). This bladder applies pressure to the water so that as the water level drops it drops under a constant pressure. The pump's on-board pressure switch turns on at a low PSI and turns off at a high PSI. On the model I'm using, the low PSI is factory-set to 60 PSI, and the high PSI is adjustable. I've turned the adjuster screw two turns clock-wise to bump it's high PSI range up a bit (however at this time I've not confirmed what this is yet -- maybe 70 or 75 PSI) (I do have plans to install a pressure gauge as listed above). So with the accumulator, you pump it up to the same PSI as the pump's low switch point, which is 60 PSI, so that no matter what we always have at least a minimum of 60 PSI acting at the solenoid.

What is the purpose of the Accumulator?
The purpose is that the pump won't have to constantly cycle every time the solenoid is opened. The pump has an internal check valve so it can turn on and hold pressure against a closed solenoid. But the moment the solenoid is opened, the pressure rapidly drops causing the pump to kick on. Think of the accumulator as a Pressure Reserve. Because I am planning to use a programmable microcontroller to operate my water injection (with infinite trigger points) (planning to program a 10-point linear duty cycle), I plan to cycle the injector A LOT. Without the accumulator, the pump would be cycling like crazy shortening it's life span and increasing the current load on my electrical system. The accumulator is a great device to have!

The Nozzle: I'm currently using a stainless-steel 15 GPH @ 100 PSI full cone misting nozzle from McMaster Car, p/n 3178K47 (About $11, click here). This Nozzle is manufactured In The USA by Hago and is labeled M15. Click here for a Hago Nozzle Datasheet. I have also ordered p/n's 3178K46 and 3178K45 which are the 10 GPH and and 5 GPH flow rate nozzles. The way I've designed this provides for easy in-the-field swapping. All I need is a pair of pliers. I'll need to experiment with it to see what flow rate works best. I'm pretty sure the 15 GPH that I have is too big but it's the only nozzle I have at the moment so it will be tested first.

The Line: Polyethylene Plastic Tubing, 1/4" OD x 11/64" ID x 100 feet - $8 on Amazon (link). Rated to 150 PSI and 140 degrees F. Should be plenty good!

The Fittings: I'm using a whole bunch of different fittings all found on Amazon. Search for "push to connect" and look for manufactures Legris and MettleAir. If you have any specific questions let me know. I just researched the specs for inlet and outlet port fittings and then searched for these accordingly on Amazon. For example here is a 90-degree 3/8" NPT x 1/4" push-to-connect fitting for use at the water pump, and here is a straight 1/4" NPT x 1/4" push-to-connect fitting used at the solenoid.

Sealing: I originally used teflon tape (I already had some, but here is a link for reference), but I found that I had to tighten the fittings so much that I was afraid I was going to break something (as the pump and accumulator both has plastic housings) (maybe I wasn't using enough tape? I went around and around 2 or 3 times...). So I did the last few remaining fittings using my favorite gasket sealer, Permatex High Tack (p/n 80062 - $7 - link). Not even a drop and I didn't have to excessively tighten the fittings. If I ever need to take any of the teflon fittings off then I'll be reassembling with High Tack.

Last note: One issue I had is that the accumulator for some reason uses huge 1/2" NPT ports and I could not find 1/2" NPT x 1/4" push-to-connect fittings. So I had to first get a pair of 1/2" NPT to 3/8" NPT bushings, and then I could use some 3/8" NPT x 1/4" push-to-connect fittings I had already ordered. We happened to have these bushings laying around at the shop, but for an Amazon example, see this link.

And that's about it. You'll need to come up with your own means of triggering the solenoid. In the past I used an adjustable pressure switch, but I don't have any ordering or product links to help you. Search around for one and you should find it. For me it will be done digitally :smokin: :smokin: :smokin:

And that was it for the first day. Got the tank mounted and got the pump and solenoid tested and some wiring figured out.
#80
Projects and Build-Ups / Re: The Rebirth
April 19, 2015, 02:26:31 PM
March 1, 2015 (continued): Project "Complete Water Injection" Day 1 (continued)

So I did something I didn't want to do and that was mount the tank in the trunk. Reasons for this include: Very short distance to intake (other side of the firewall), and I figure I can mount the pump under the trunk so that the tank can sit as low as possible in the trunk.

I did decide to just remove the interior back carpet and insulation (shown removed above), which amounted to almost 17 lbs saved (but yes this water injection is gonna add 20+ lbs).

With the tank firmly mounted as low as possible in the trunk, it was time to get the solenoid mounted. This is 1/4" nylon high pressure line and some random 1/4" solenoid I purchased from Amazon (link) (more info posted below).
#81
Projects and Build-Ups / Re: The Rebirth
April 19, 2015, 02:08:48 PM
March 1, 2015 (continued): Project "Complete Water Injection" Day 1

I figured that since I've already done work on the water injection  -- incorporating a mount-point in my new intake as well as built a double-sided threaded injector insert -- that I should star with that. I know this will be the most aggressive and therefore the most amount of continued S/C use I've ever done so I really, really want this working before the big day.

As I have a lot of updates, I'm gonna try to limit the chatter and let the pics do the work.

First step was to get the reservoir mounted. If you recall I already got a water injection tank, originally mentioned at reply 304. I originally got a 5-quart tank which turned out to be just too tall. So I got a second 4-quart (1 gallon) tank as well which is much more versatile. Will 4-quarts be enough for a 20-25 minute track session? I have no idea. I was supposed to return the 5-qt tank but as you can imagine I was just so busy ... I still have it. $14. Need to see if they'll take it back.

First thing was to see where to install the tank. I want to keep the tank towards the center of the car and also as low as possible.

Engine Bay
I really like the engine bay idea but it gets bloody hot in there and cold water has better performance (requires more heat energy to change it's liquid state to a gas).

Rear Trunk
The trunk mount is maybe best because it's isolated and easy to work on, but I don't like the weight so far back of this already rear-axle-heavy car.

Interior
The interior seems nice too because the weight is centralized in the car and I could add water without having to stop...... But, as the cap has a small vent to cope with pressure changes (a nice feature I'd like to keep), I'll have alcohol vapors in the cab which would be horrible. I wonder also if this would be considered an "open container"? :rofl3: "I got a DUI from my Water/Alcohol Injection System." Nevertheless, the seats don't go all the way back with the tank there, so... yeah...

Other places
The tank mounted nicely in a few other places, but it left no of very limited means of refilling, either by partial or complete blockage to the cap. One such place was below my air filter in the cavity in front of the driver's rear tire. There is a TON of space in there, but I'd have to use a cap with a small diameter filler neck/hose (which would take a long time to refill) and I won't be able to easily inspect the water level (since it'd be mostly hidden).

In front of the cab
Placing the tank in front of the cab is good for weight distribution but not good for delay of water supply, or any other sort of pumping/starving concerns. Ideally I'd think it should be kept close to the intake.
#82
Projects and Build-Ups / Re: The Rebirth
April 19, 2015, 01:43:40 PM
March 1st, 2015

OK GUYS!!

It is now March and TIME FOR THUNDERHILL!!! I am registered for my FIRST track day event this March 22nd!! I will be participating with NorCal Racing, http://www.ncracing.org

T-MINUS 22 DAYS AND COUNTING, and as Keisuke Takahashi would be translated to say, IT'S TIME TO KICK OUT THE JAMS!

Over the past few weeks I have been assembling the following Track Day TODO list. A few things have been accomplished up to this point (and are crossed out) but I haven't been really 'pushing' it yet. But now it's March and I want to get going with this stuff so that I'm not doing everything at the last minute.

BigMike's First Track Day TODO List:

  • 2015 sticker on license plate
  • Air splitter
  • Angle up panel & LCD
  • Brake rotor air ducting
  • Build heat shield for header
  • Bypass AC comp w single Alt belt
  • Change engine oil
  • Check Compression
  • Check EFI Codes
  • Check exhaust leak
  • Check for SC belt slipping
  • Check ignition timing
  • Check Plug Gaps
  • Check valve cover nut torques
  • Check water temp wire to ECU
  • Checked tire air pressure
  • Clean air filter
  • Clearance hood latch to IC inlet pipe
  • Check clutch master cylinder issue
  • Data log Wide Band O2 readings
  • Dremmel GoPro Case to clear SD slot
  • Firewall hole below clutch master
  • Fix blue water inj LED
  • Fix Boost Guage lamp once & for all
  • Fix high idle
  • Fix trunk lid rattle
  • Front suspension clunk
  • Gas vapor leak
  • Get Datalogging w Propeller working
  • Get new helmet
  • Inj cleaner
  • Inspect Spark plugs
  • Install MT90
  • Install better clamp at oil return line
  • Install new brake pads
  • Install replacement Wide band O2
  • Install switch for speakers/woofer
  • Lighten trunk lid webbing
  • Lower the cooling fan controller box
  • Machine brake rotors
  • Modify Woofer to fit lower
  • Mount dash mat
  • Mount Propeller LCD panel
  • Mount SC, Fan, & Speaker switches
  • New carpet for back wall
  • New light-weight side vent engine fan
  • New Turtle Stickers
  • PR suspension squeak
  • Remove hood supports
  • Remove rear bumper frame
  • Remove sub woofer and protect wires
  • Remove Wall carpet & trunk carpet
  • Replace defective clutch master cylinder
  • Replace DR Wheel Bearing
  • Replace leaking axle seal
  • Restore my Exhaust
  • Restore my Intake
  • Reverse hood scoop
  • Rewire fuel selector switch ground
  • Rotate tires
  • Smog!
  • Wash Car finally
  • Water Injection: Connect all water lines
  • Water Injection: In-cab pressure gauge
  • Water Injection: Install blue water solenoid LED
  • Water Injection: Install Injector
  • Water Injection: Get 33% smaller M10 and 66% smaller M5 injection nozzles
  • Water Injection: Mount & wire check valve
  • Water Injection: Multi-cog duty cycle
  • Water Injection: Program a quick and dirty injection routine
  • Water Injection: Install 8amp PCB water injection relay
  • Water Wetter

The list has been compiled over the span of about a month, so some things might not make sense and there may be duplicates as I kept writing down things that came to mind while making my weekend commutes.

I've also whittled the list down in terms of importance.

This is the "WHAT HAS TO BE DONE" list:

  • Driver's rear wheel bearing
    • it's toast
  • Machine Brake Rotors
    • they've been slightly warped for at least 10 yrs and I'm not going to go to a track knowing they are warped
  • New brake fluid
    • I'm still using the same fluid from 2001?
  • Fix my axle seal leak
    • obviously no leaks are allowed at a track
  • Install new Redline MT90
    • To change the above seal I have to drain my Amsoil that now has over 60k on it. It's time for new oil. Figured I would give MT90 a shot / used to run it back in the day and liked it
  • Address Clutch Master Cylinder Issue
    • my replacement clutch master cylinder has been acting up and it should be warrantied/replaced
  • Water Injection
    • as I've not begun datalogging my AFRs yet, and I haven't built my own Grunt Box (what's a Grunt Box?), I need to make sure things stay cool to protect the engine
  • Mount S/C & IC Fan Switches
    • I can't have anything flying around
  • Mount dash mat
    • I can't have anything flying around
  • Mount Propeller LCD panel
    • I cant' have anything flying around
  • Add a switch to my speaker system
    • otherwise the speakers make a constant high frequency noise when not playing music
  • Change engine oil
    • I have over 7k on the oil, it's overdue
  • Clean air filter
    • haven't done this in a looong time
  • Wash the car
    • their rules require a presentable car at track day. I'll try my best!

If I can remember correctly those lists are correct. So as you can image I have a LOT of updates to post which is going to take some time! So that's what I'll be posting next :thumbs:
#83
Projects and Build-Ups / Re: The Rebirth
April 19, 2015, 12:42:33 PM
Feb 28, 2015: Wide Band Error

.......aaaaaaaand no more than a week went by and my Wide Band stopped working. Error code 8 = Bad O2 sensor.

.......aaaaaaaand then I read the installation guide and it states that the sensor must be calibrated with the gauge BEFORE installing the sensor for the first time.

So that's it. I'm screwed. Also more than 3 months had passed which was the return policy on Amazon I think so tough luck on me. I should have read things more carefully back in October.

And now I think I know why the gauge was so finicky!
#84
Projects and Build-Ups / Re: The Rebirth
April 19, 2015, 12:12:07 PM
Feb 22, 2015: Replaced Battery, *finally* installed Wide Band O2 gauge!

After almost 5 years my small CNC battery bought the farm. It's been through a lot. Originally installed June 3, 2010 (reply 26), it has suffered life without an alternator (reply 119) and has been fully drained dead a few times by leaving my spare keys in the car at work powering the subwoofer allllll day long. I remember a few ppl teasing my at work when I first installed it. When they saw me replacing it they asked if it was the 4th or 5th replacement and I was like, wat, I've had the same since 2010! Great lil battery.

It finally died out after I reverted back to my custom intake. I noticed it was really laboring when cranking. Was it just getting old? Then one day it didn't have enough juice to even start-up. My mother brought some jumper cables over and I got it running, and even after trickle charging the rest of the day the battery was still dead after work. I got a new one installed and WOW what a difference! Cranks like crazy now.

Side note: About a week later found out that I had re-plumbed the vacuum lines to my ABV incorrectly and it was closed 100% of the time. (Remember that real trick but also semi-complicated dual-channel check-valve and electronic solenoid vacuum arrangement I designed? See reply 306.) With that connected wrong, the engine was forced to breath through the stationary S/C and the full IC tract during cranking. This didn't help the old battery and was surely a supporting factor to it's demise, but the battery was on it's last life anyhow so I'm really glad I got it replaced.

Pics installing the battery. Out with the old, in with the new! It is the same battery as before, a MK Power ES17-12. I have to just slightly open up the terminals to fit 6mm Toyota bolts.

Later this same day I _finally_ hooked up my Wide Band O2 gauge!! If you recall from early last October, when I built my new exhaust I also installed my new wide band O2 sensor (reply 334). It's been sitting in the exhaust system for almost 5 months, not connected to anything. Was very nice finally getting the gauge portion of the kit installed!

I decided to leave the narrow band O2 gauge installed so that I can compare it with a Wide Band sensor, and my initial thought is that these Wide Bands are really finicky. They are all over the place. Bouncing around and moving A LOT, much more than my narrow gauge. However when you get into an open loop it finally stabilizes and gives nice, good readings. This gauge has a digital output which I plan to get connected to my Propeller to start datalogging. More to come on that later, and also more to come about this gauge's finicky display.
#85
Projects and Build-Ups / Re: The Rebirth
April 19, 2015, 11:46:12 AM
Feb 19 & 21, 2015: Efficient mode in two nights

Got everything back to normal in two shots. Did the intake on the 19th (took about 2 hrs) and then the Exhaust on the 22nd (took about 3 hrs).

Spent extra time with the intake marking things and carefully organizing and stowing parts in my garage. Also got some fiberglass-less pipe insulation and wrapped up all piping before the S/C.

The hardest part with the intake is that I have to transfer my TPS and ABV back and forth, taking time to align each one. Of course the TPS must be carefully set, but the way my custom intake uses the ABV backwards, it also must be aligned and carefully lowered simultaneously with the intake manifold inlet. Also I'm using Hi Tack gasket sealer at the manifold inlet so it takes time to clean it up and reseal. I'll definitely find some spares before 2017.

Also found a few issues with the exhaust: EGR bolt threads at the header needed to be cleaned out, modified how I'm mounting my AFM to make it easier to access the EGR valve itself, and I made some changes to my exhaust hanger brackets.

It was nice swaping parts around, less efficient and more polluting smog legal parts VS my more efficient and less polluting custom parts. I got to get things more organized; I'm better prepared for my next smog day.
#86
Engine Theory / Re: 600cc V8 engine
April 14, 2015, 07:43:40 AM
Ok I did a few reverse image searches (I use this Extension with Firefox to make this reallllly simple to do: https://addons.mozilla.org/en-US/firefox/addon/google-image-search-1/) and came up with a few hits:


It's listed towards the bottom of http://jalopnik.com/the-smallest-v8s-ever-made-1221935889

Machining process shown here http://jalopnik.com/5761950/watch-a-chunk-of-aluminum-cncd-into-an-engine-block

I only did a reverse search on four images (2 found, 2 not found), but you get the idea.

BigMike
#87
Engine Theory / Re: 600cc V8 engine
April 14, 2015, 07:40:28 AM
Quote from: TheEquineFencer on April 02, 2015, 03:35:34 PM
How do I get to the pictures or info on the original posting for this?
Hello TheEquineFencer!

Hmmm, yeah the link and image URLs are dead... Okay, I just tried the Wayback machine and it has some good hits I think. Try this link, http://web.archive.org/web/20140501000000*/http://dot.etec.wwu.edu/fsae/v30/v30pics.html, and then try some dates from a few yrs past.

I tried the June 20 2014 date and it loads thumbnails but not the full size images: http://web.archive.org/web/20140620234022/http://dot.etec.wwu.edu/fsae/v30/v30pics.html Maybe some older copies of the site have full size pics, or, maybe you can try a reverse Google Image search on the thumbnails to see if they were mirrored anywhere before being removed.

BigMike
#88
Projects and Build-Ups / Re: The Rebirth
March 05, 2015, 10:47:10 PM
Feb 11, 2015: Smogged and registered :thumbs:

And finally the moment you've been waiting for, my baby is good for yet another two more years


She passed with flying colors on the high speed but barely sneaked by on the low speed test. Hydrocarbons were pretty high. I'm betting that with both cams slightly retarded by the thinner MLS head gasket it's allowing more unburned fuel to get out than normal. Passing is passing and I'm freak'n glad that is over with.


After smogging the car I immediately left for San Jose. Upon returning back to Fresno, combined city+highway fuel mileage to and from the bay area? 23.3 MPG. With this sort of city+hwy use with my improved intake/exhaust I'm certain to make at least 28 MPG. Will be very interesting to see what happens after I put my parts back on and make another trip across state. :_order:
#89
Projects and Build-Ups / Re: The Rebirth
March 05, 2015, 10:37:54 PM
RESULTS!!

:shocking: 
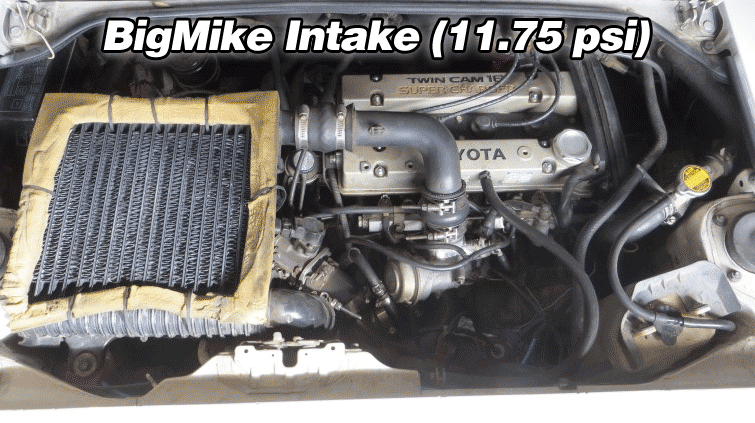
So check this out guys!! :shocking:

Going off my boost gauge, peak boost dropped from 11.75 PSI to just 9.5 PSI! I didn't change anything but the intake leading up to the stock S/C inlet manifold. Same crank and S/C pulley (don't need to change those for smog) and was making the same 11.75 PSI after reverting to stock exhaust two days prior.

Only non-stock mod here is my smaller 110mm S/C pulley (~10mm smaller than stock, more info at reply #330) and of course the ABV mod for > 8psi boost.

So there you have it. Toyota designed an uber restrictive intake system, which is precisely why I built my own. I do have a big advantage with the stock battery gone. But yeah, 2-1/4 PSI in boost gain purely from my own custom intake is just awesome :smokin:

#90
Projects and Build-Ups / Re: The Rebirth
March 05, 2015, 10:32:42 PM
Feb 8, 2015: Preparing Intake for Smog

This was the much easier part of the job so I didn't take that many pics. I did take extra time going back to my old pics to make sure all stock parts were accounted for.

As designed, the process was super easy. I spent more time ensuring all vacuum lines were correct than the actual physical labor of switching out the parts.

Pic 1: IC removed, showing my straight shot intake through the 3S-GTE turbo throttle body.

Pic 2: The awesome 120-degree stainless pipe simply connected to the stock S/C inlet manifold.

Pic 3: One piece air filter assembly extraction.
Pic 4: Everything all back together and my car now 100% smog legal and inefficient :hammerhead: